Imagine walking into a space where the walls themselves seem to glow, where architecture is highlighted, and a captivating ambiance fills the air. That’s the power of LED wall washers! These amazing lights aren’t just about brightness; they’re about transforming spaces, creating moods, and adding a touch of magic, whether it’s a cozy living room, a grand building facade, or a lush garden landscape. This guide is your one-stop resource for everything you need to know about LED wall washers – from the basics to advanced techniques. We’ll cover it all, so you can confidently choose, install, and use these versatile lights to bring your vision to life.
I. Introduction
Have you ever noticed how some buildings or rooms just feel different? Often, it’s the lighting that makes all the difference. LED wall washers are a special kind of light designed to “wash” a wall with a smooth, even glow. This isn’t just about making a room brighter; it’s about changing how it looks and feels. Think of it like painting with light!
This guide is for anyone who wants to use lighting to make their spaces more beautiful, functional, and secure. Whether you’re a homeowner, an interior designer, an architect, someone who loves working in their yard, or a business owner, this guide will give you the knowledge you need.
We’ll start with the fundamentals, then move on to choosing the right lights, installing them correctly, and even getting creative with different design ideas. We’ll also look at how to keep your lights working well for years to come. By the end of this guide, you’ll be well-equipped to use LED wall washers to enhance any environment.
II. Understanding LED Wall Washer Lighting: The Basics
A. What Exactly is Wall Washing?
Wall washing is a lighting technique where you light up a vertical surface, like a wall, evenly from top to bottom. It’s like giving the wall a “bath” of light. The goal isn’t just to make the wall brighter; it’s to make it smooth and even. This hides minor imperfections and makes the space feel more open and inviting.
Think of it like this: regular lights often create bright spots and shadows. Wall washing, on the other hand, spreads the light out so you don’t get those harsh contrasts. It’s a softer, more subtle effect.
How does it work? It’s all about the placement of the lights and the type of light fixture you use. We’ll get into the specifics later, but the basic idea is to position the lights at a certain distance from the wall and use a fixture that spreads the light widely.
It’s important not to confuse wall washing with just pointing a bright light at a wall. That will likely create a hotspot, which is the opposite of what we want!
B. Wall Washing vs. Wall Grazing: A Crucial Distinction
While wall washing creates a smooth, even look, wall grazing is all about texture and drama. These two techniques are related, but they create very different effects.
Wall Grazing Defined:
Wall grazing is like shining a light along the wall instead of directly at it. This creates strong shadows that highlight any texture on the surface – think brick, stone, or even textured wallpaper. It’s a great way to add visual interest and make a wall a focal point.
Let’s break down the differences in a table:
| Feature | Wall Washing | Wall Grazing |
|---|---|---|
| Distance from Wall | Further (typically 2.5-3 feet or more) | Closer (typically less than 2 feet) |
| Beam Angle | Wider | Narrower |
| Effect | Smooth, even illumination; minimizes imperfections | Highlights texture; creates shadows |
| Ideal Surface | Smooth, flat walls | Textured walls (brick, stone, etc.) |
| Purpose | To make the room appear larger and brighter, highlighting the entire surface. | To highlight the texture and detailed, create visual variety. |
When to Choose Wall Washing:
- You have a smooth, flat wall that you want to make look brighter and more spacious.
- You want to minimize imperfections on the wall.
- You want to create a soft, even background for artwork or other wall hangings.
- You’re lighting a hallway or other area where you need good, even visibility.
When to Choose Wall Grazing:
- You have a textured wall (brick, stone, textured wallpaper) that you want to accentuate.
- You want to create a dramatic, eye-catching effect.
- You want to add visual interest to a room.
- You’re lighting a fireplace, an accent wall, or a feature wall.
Can you combine them?
Absolutely! In fact, combining wall washing and wall grazing is a great way to create a layered, sophisticated lighting design. For example, you might use wall washing for the main walls of a room and wall grazing to highlight a stone fireplace or an accent wall.
C. The Anatomy of an LED Wall Washer
To really understand how these lights work, let’s take a look inside. Here are the main parts of a typical LED wall washer:
1. LED Chips:
These are the tiny light sources themselves. They’re what make LED lights so energy-efficient and long-lasting. There are different types of LED chips, like SMD (Surface Mounted Device) and COB (Chip on Board). SMD chips are common and versatile, while COB chips are often used for brighter, more focused light.
Color Options:
- Single Color: Just one color, like white or warm white.
- RGB: Red, Green, and Blue LEDs that can mix to create millions of colors.
- RGBW: Red, Green, Blue, and White LEDs. The white LED adds brightness and allows for more pastel shades.
- Tunable White: Allows you to adjust the color temperature of the white light, from warm to cool.
CRI (Color Rendering Index): This is a measure of how accurately the light shows the true colors of objects. A higher CRI (80 or above) is better, especially for things like artwork or retail displays.
2. Optics:
These are the lenses or reflectors that shape the light coming from the LED chips. They control the beam angle, which is how wide or narrow the light spreads out.
Beam Angle:
- Narrow Beam Angle: Creates a focused beam of light, good for wall grazing or highlighting specific objects.
- Wide Beam Angle: Creates a broad wash of light, good for wall washing.
Different types of optics can create different effects, like a sharp, defined beam or a soft, diffused glow.
3. Housing:
This is the outer casing of the light fixture. It protects the internal components and gives the light its shape. Common materials include aluminum (good for heat dissipation), stainless steel (durable and weather-resistant), and plastic (often used for indoor fixtures).
4. Heat Sink:
LEDs, while efficient, still produce some heat. The heat sink is a crucial part that draws heat away from the LED chips, keeping them cool and extending their lifespan. It’s usually made of aluminum and has fins or ridges to increase its surface area.
5. Driver/Power Supply:
This is the “brain” of the LED wall washer. It converts the incoming electrical power (like from your wall outlet) into the correct voltage and current for the LEDs. Some drivers are built into the fixture (internal), while others are separate (external).
Voltage:
- Low Voltage (12V or 24V): Safer and often easier to install, especially outdoors. Requires a transformer.
- Line Voltage (120V or 240V): Standard household voltage. Doesn’t require a transformer, but installation may be more complex.
Dimming Compatibility: Not all drivers are dimmable. If you want to dim your lights, make sure the driver is compatible with the type of dimmer you want to use.
6. Control System:
This is how you control the lights. It can be as simple as an on/off switch, or it can be more complex, like a dimmer, a remote control, or even a smartphone app.
Control System Options
- Simple on/off switches The most basic way to control your lights.
- Dimmers Allow you to adjust the brightness of your lights, creating different moods and saving energy.
- Remote controls Offer convenient wireless control over your lights.
- DMX controllers Used for more complex lighting setups, especially in commercial or entertainment settings. Allow for precise control over individual fixtures and the creation of dynamic lighting effects.
- Wi-Fi/smart home integration Control your lights from your smartphone or tablet, or even with your voice using a smart home assistant.
7. Mounting Hardware:
This is how the light fixture is attached to the wall, ceiling, or ground. There are different types of brackets for different mounting situations.
Mounting Hardware Options
- Surface mounting The fixture is attached directly to the surface.
- Recessed mounting The fixture is set into a hole or cavity in the surface, creating a flush look.
- Adjustable brackets Allow you to change the angle of the light after installation.
III. The Benefits of LED Wall Washers
A. Aesthetic Advantages
LED wall washers are not just practical; they’re masters of aesthetics, capable of remarkable transformations.
- Enhancing Architecture: They possess the remarkable ability to accentuate the textures, forms, and intricate details of architectural elements. By casting light strategically, they create captivating visual drama, making buildings appear more impressive and inviting.
- Setting the Mood: These versatile lights are pivotal in shaping a room’s ambiance. Whether you desire a warm and snug atmosphere or a sleek and contemporary vibe, LED wall washers, particularly through adjustments in color temperature, allow you to tailor the lighting to evoke specific emotions.
- Drawing Attention: Wall washers excel at directing focus. They serve as a subtle yet potent tool to highlight artwork, retail displays, signage, or any focal points you wish to emphasize, ensuring these elements capture attention.
- Creating Visual Interest: Even seemingly mundane surfaces gain depth and dimension with wall washing. The play of light and shadow adds an artistic touch, transforming flat walls into engaging visual experiences.
B. Functional Benefits
Beyond their aesthetic appeal, LED wall washers contribute significantly to the functionality and safety of various environments.
- Improved Visibility: By evenly illuminating spaces, they enhance safety and ease of navigation. Shadows and dimly lit areas are minimized, reducing the risk of accidents and creating a more secure environment.
- Security Lighting: In outdoor settings, wall washers deter potential intruders by increasing visibility around buildings. Well-lit exteriors enhance security and create a sense of safety.
- Task Lighting: In specific scenarios, they can provide focused illumination for particular activities. For instance, they can be employed to light up workspaces, reading areas, or any location where concentrated lighting is required.
C. Energy Efficiency and Sustainability
LED technology is celebrated for its eco-friendliness, and wall washers exemplify these advantages.
- Comparison to Traditional Lighting: Compared to older lighting technologies like incandescent, halogen, or fluorescent lights, LEDs are drastically more energy-efficient. This efficiency translates into lower electricity bills and a reduced carbon footprint.
- Long Lifespan: The extended lifespan of LED wall washers means less frequent replacements. This not only saves money but also reduces waste, contributing to a more sustainable approach.
- Low Heat Emission: LEDs emit minimal heat, which offers dual benefits. It reduces the load on air conditioning systems, leading to further energy savings, and it makes them safer for use near heat-sensitive materials.
- Eco-Friendly Materials: Unlike some traditional lighting options, LEDs do not contain hazardous materials like mercury, making them a more environmentally responsible choice.
D. Versatility and Adaptability
The versatility of LED wall washers is one of their most compelling attributes.
- Indoor and Outdoor Use: With appropriate IP ratings (Ingress Protection), they can be safely used in both indoor and outdoor environments. This adaptability makes them suitable for various applications.
- Wide Range of Applications: Their versatility extends to numerous settings, including residential homes, commercial buildings, hospitality venues, retail spaces, and even event lighting.
- Customization Options: With various choices in color, beam angle, control methods, and mounting styles, LED wall washers can be tailored to meet the unique requirements of any project.
IV. Choosing the Right LED Wall Washer for Your Project
A. Assessing Your Needs
Before diving into the technical details, let’s think about your specific project. Asking yourself these questions will help you narrow down your choices and find the perfect LED wall washer:
Answering these questions is like creating a blueprint for your lighting project. It will guide you toward the perfect LED wall washer.
- What is the purpose of the lighting?
“Are you trying to create a dramatic accent, provide general ambient light, improve safety and security, or highlight a specific task area? Different purposes require different lighting approaches.”
- What is the size and shape of the area to be illuminated?
“Grab a measuring tape! Knowing the dimensions of the wall or surface you want to light is crucial. This will help you determine the number of fixtures you need and their brightness.”
- What is the texture and color of the surface?
“A smooth, light-colored wall will reflect light differently than a rough, dark-colored wall. Texture and color influence the choice between wall washing and wall grazing.”
- What is the desired mood or atmosphere?
“Do you want a warm, cozy feeling? A cool, modern look? A vibrant, energetic vibe? The color temperature of the light plays a big role here.”
- What is your budget?
“LED wall washers come in a wide range of prices. Setting a budget early on will help you narrow down your options.”
- What is the existing electrical infrastructure?
“Do you have existing wiring? What voltage is available? Do you need to add new wiring or control systems? These are important practical considerations.”
- Are there any building codes or regulations to consider?
“Some areas have rules about outdoor lighting, energy efficiency, or light pollution. Make sure your project complies with local regulations.”
- How important is energy efficiency?
“If energy savings are a priority, look for fixtures with high lumens per watt and a long lifespan.”
- Do you need dimming or color-changing capabilities?
“If you want to be able to adjust the brightness or change the color of the lights, you’ll need to choose fixtures and control systems that offer these features.”
- Will the lights be exposed to the elements?
“If the lights will be outdoors, you must choose fixtures with an appropriate IP rating to protect them from dust and water.”
- How Easy is installation?
“If you do not have any experence on this, you must consider to hire a professinal.”
B. Key Specifications to Consider
Now that you’ve thought about your needs, let’s get into the technical specifications of LED wall washers. Understanding these specs will help you make an informed decision:
1. Brightness (Lumens):
Lumens measure the amount of light a fixture produces. More lumens = brighter light. But how many lumens do you need?
How to calculate the required lumens:
- Measure the area: Find the square footage (or square meters) of the wall or surface you want to illuminate.
- Consider the purpose: For general ambient lighting, you might need 1-2 lumens per square foot. For accent lighting, you might need 5-10 lumens per square foot or even more.
- Multiply: Multiply the area by the desired lumens per square foot. This gives you a rough estimate of the total lumens you need.
Example: A 100-square-foot wall for accent lighting might need 500-1000 lumens.
Important Note This is just a starting point. Other factors, like the color of the wall and the desired effect, can influence the required brightness.
2. Color Temperature (Kelvins):
Color temperature describes the color appearance of the white light. It’s measured in Kelvins (K).
Color Temperature Options
- Warm White (2700K-3000K): Has a yellowish glow, like traditional incandescent bulbs. Creates a cozy, inviting atmosphere. Good for living rooms, bedrooms, restaurants.
- Neutral White (3500K-4000K): A more neutral white light. Good for kitchens, bathrooms, offices.
- Cool White (5000K-6500K): Has a blue-ish tint. Creates a bright, energetic atmosphere. Good for task lighting, security lighting, commercial spaces.
Choosing the right color temperature depends on the mood you want to create and the function of the space.
3. Color Rendering Index (CRI):
We touched on this earlier. CRI measures how accurately the light shows the true colors of objects. A higher CRI (80 or above) is generally better, especially for applications where color accuracy is important (artwork, retail displays, etc.).
4. Beam Angle:
The beam angle determines how wide or narrow the light spread is. This is crucial for achieving the desired effect (wall washing or wall grazing).
- Narrow Beam Angle (10-45 degrees): Creates a focused beam of light. Good for highlighting specific features or for wall grazing.
- Medium Beam Angle (45-90 degrees): A more general-purpose beam angle.
- Wide Beam Angle (90-120 degrees or more): Creates a broad wash of light. Good for wall washing large areas.
Matching the beam angle to the size and shape of the area you want to illuminate is essential. You don’t want a beam that’s too narrow or too wide.
5. IP Rating:
This is critical for outdoor installations. The IP (Ingress Protection) rating tells you how well the fixture is protected against dust and water.
IP Rating Breakdown
- First Digit: Protection against solid objects (dust, dirt, etc.). Ranges from 0 (no protection) to 6 (dust-tight).
- Second Digit: Protection against liquids (water). Ranges from 0 (no protection) to 8 (protection against immersion in water).
Common IP Ratings for Outdoor Use:
- IP65: Dust-tight and protected against water jets. Good for most outdoor applications.
- IP67: Dust-tight and protected against temporary immersion in water.
- IP68: Dust-tight and protected against continuous immersion in water.
Always choose a fixture with an IP rating that’s appropriate for the environment where it will be installed.
6. Voltage:
We discussed this briefly earlier. The two main options are:
- Low Voltage (12V or 24V): Safer, easier to install, often used for landscape lighting. Requires a transformer to step down the voltage from your household power supply.
- Line Voltage (120V or 240V): Standard household voltage. Doesn’t require a transformer, but installation may be more complex and should be done by a qualified electrician.
The choice depends on your project, your comfort level with electrical work, and local electrical codes.
7. Wattage:
Wattage measures the power consumption of the light fixture. Lower wattage = less energy use. With LEDs, you can get a lot of light (lumens) for a relatively low wattage.
8. Lifespan:
LEDs are known for their long lifespan, often rated for 25,000 hours or more. This means you won’t have to replace them nearly as often as traditional light bulbs.
9. Control Options:
Consider how you want to control your lights. Options range from simple on/off switches to advanced smart home integration.
- DMX: A professional-grade control protocol for complex lighting setups.
- Wi-Fi: Control your lights from your smartphone or tablet.
- Remote Control: A convenient way to control lights wirelessly.
- Dimmers: Adjust the brightness of your lights.
10. Warranty:
Look for a fixture with a good warranty. This shows that the manufacturer stands behind their product. A longer warranty is generally better.
C. Choosing the Right Type of Fixture
There are several different types of LED wall washers, each with its own advantages and disadvantages:
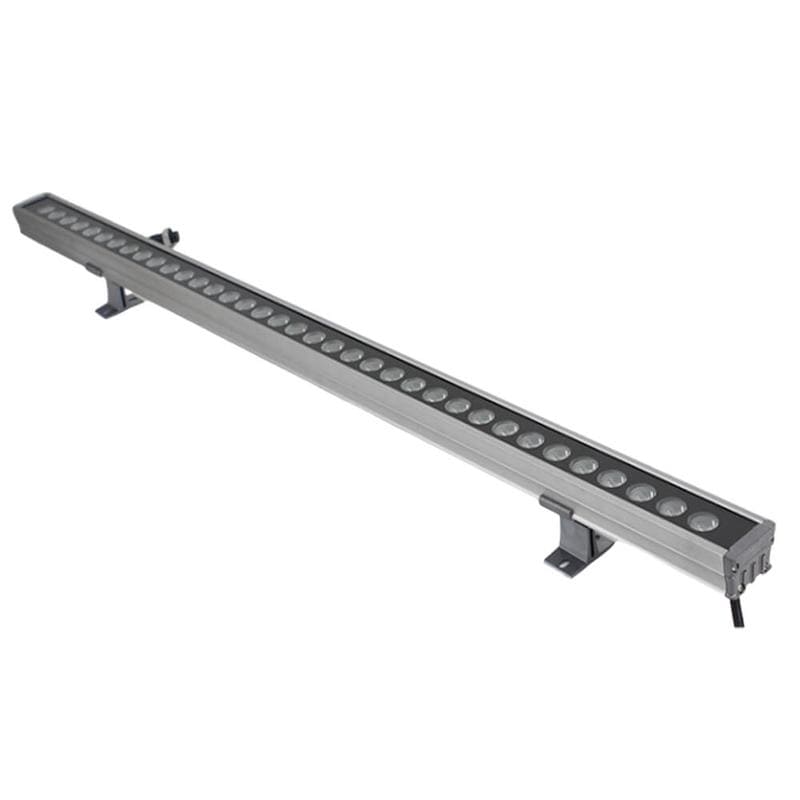
1. Linear Wall Washers:
These are long, narrow fixtures that produce a continuous line of light. They’re great for illuminating long stretches of wall or for creating a sleek, modern look.
Advantages:
- Even illumination along a long surface.
- Sleek, modern appearance.
- Relatively easy to install.
Disadvantages:
- May not be suitable for very tall walls.
- Can be more expensive than other types of fixtures.
Best Applications:
- Long hallways.
- Exterior building facades.
- Under-cabinet lighting.
2. Panel Wall Washers:
These fixtures have multiple LEDs arranged in a panel or grid. They’re good for illuminating large areas or for creating a more powerful wash of light.
Advantages:
- Can cover a large area with light.
- High brightness output.
- Often available with adjustable beam angles.
Disadvantages:
- Can be bulky and less discreet than other types of fixtures.
- May require more complex installation.
Best Applications:
- Large walls.
- Stage lighting.
- Commercial spaces.
3. Adjustable Wall Washers:
These fixtures have a bracket or joint that allows you to adjust the angle of the light. This gives you more flexibility in directing the light where you need it.
Advantages:
- Versatile and adaptable.
- Can be used for both wall washing and wall grazing.
- Allows for fine-tuning the lighting effect.
Disadvantages:
- May be more expensive than fixed fixtures.
- May require more careful adjustment during installation.
Best Applications:
- Highlighting artwork or architectural details.
- Creating dynamic lighting effects.
- Situations where the lighting needs may change over time.
4. Recessed Wall Washers:
These fixtures are installed into the wall or ceiling, creating a flush, minimalist look. They’re a good choice for modern interiors.
Advantages:
- Clean, unobtrusive appearance.
- Doesn’t take up any wall space.
- Good for creating a sleek, modern look.
Disadvantages:
- More complex installation (requires creating a recess in the wall).
- May not be suitable for all wall types.
- Can be more difficult to adjust or replace after installation.
Best Applications:
- Modern interiors.
- Hallways.
- Bathrooms.
5. Surface-Mounted Wall Washers:
These are the most common type of wall washer. They’re attached directly to the surface of the wall or ceiling. They’re relatively easy to install.
Advantages:
- Easy to install.
- Versatile and adaptable.
- Available in a wide range of styles and sizes.
Disadvantages:
- May not be as aesthetically pleasing as recessed fixtures.
- Can be more vulnerable to damage (especially outdoors).
Best Applications:
- Most general wall washing applications.
- Exterior building facades.
- Landscape lighting.
6. RGB/RGBW/Tunable White:
These options refer to the color capabilities of the fixture:
- RGB: Can produce millions of colors by mixing red, green, and blue light.
- RGBW: Adds a white LED for brighter whites and more pastel shades.
- Tunable White: Allows you to adjust the color temperature of the white light (from warm to cool).
The best choice depends on your project. If you just need white light, a single-color fixture is fine. If you want to create colorful effects, choose RGB or RGBW. If you want to be able to adjust the warmth or coolness of the white light, choose tunable white.
7. Rigid LED Wall Washer Vs. Flexible LED Wall Washer
Rigid LED Wall Washer:
- Traditional form factor, typically housed in a sturdy aluminum casing.
- Offers a fixed, linear structure.
- Ideal for applications requiring a consistent, straight line of light.
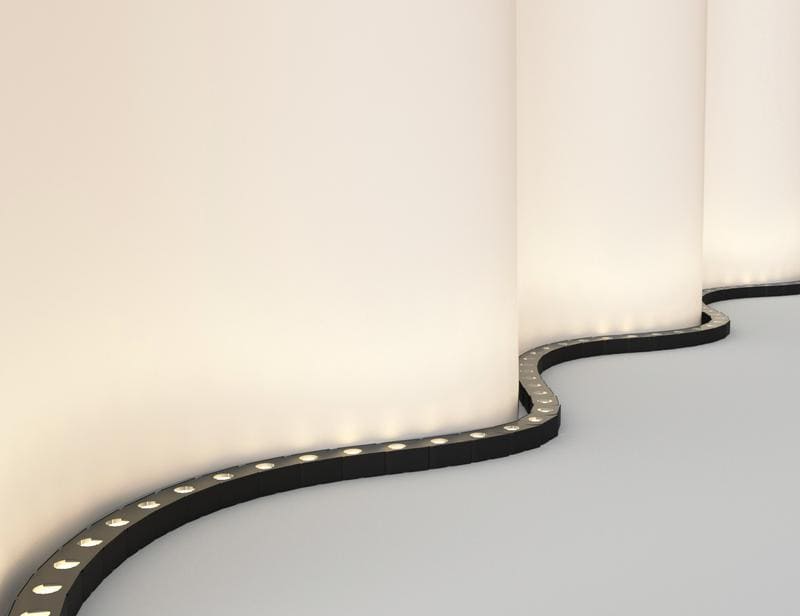
Flexible LED Wall Washer:
- Modern innovation, allowing for bending and shaping.
- Highly adaptable to curved surfaces and irregular shapes.
- Offers creative freedom in design, especially in spaces with non-linear features.
D. Consider light effect
Wall Washing:
- Creates a broad, even distribution of light across the surface.
- Minimizes shadows and imperfections, producing a smooth and uniform appearance.
- Ideal for making spaces feel larger and brighter.
Wall Grazing:
- Emphasizes texture and creates dramatic shadows.
- Highlights the architectural details and character of the surface.
- Suitable for adding visual interest and depth to a space.
V. Installation and Placement: Mastering the Art of Illumination
A. Planning Your Installation
Before you even touch a light fixture, you need a plan! Careful planning will save you time, effort, and potential headaches down the road.
1. Creating a Lighting Plan:
Don’t just start attaching lights randomly. Take some time to think about what you want to achieve and how to best accomplish it.
How to Create a Lighting Plan
- Sketch the area: Draw a rough sketch of the wall, room, or outdoor space you’re lighting.
- Identify focal points: What do you want to highlight? Artwork? Architectural features? Plants?
- Determine the desired effect: Do you want wall washing or wall grazing? What mood do you want to create?
- Choose fixture types: Based on your needs and the desired effect, select the appropriate types of LED wall washers.
- Mark fixture placement:O n your sketch, mark where you plan to install each fixture. Consider the distance from the wall, the spacing between fixtures, and the angle of the light.
- Calculate distances and angles: Use the guidelines we discussed earlier to determine the optimal placement for each
fixture.
2. Electrical Considerations:
Safety first! Lighting installations involve electricity, so it’s crucial to take the necessary precautions.
Important Electrical Considerations
- Wiring requirements: Do you need to run new wiring? If so, consult a qualified electrician.
- Circuit capacity: Make sure your existing circuits can handle the additional load of the new lights. Don’t overload circuits!
- Safety precautions: Always turn off the power at the breaker box before working with any electrical wiring. Use appropriate safety gear (gloves, eye protection).
- Hiring an electrician: If you’re not comfortable working with electricity, hire a qualified electrician. It’s better to be safe than sorry. Especially for line voltage installations or complex wiring, professional help is highly recommended.
3. Tools and Materials:
Gather everything you need before you start the installation. This will save you time and frustration.
Essential Tools and Materials
- LED wall washer fixtures
- Mounting hardware (screws, brackets, etc.)
- Drill (with appropriate drill bits for your wall type)
- Screwdriver (matching the screws)
- Wire strippers/cutters
- Wire connectors (wire nuts or other suitable connectors)
- Electrical tape
- Level
- Measuring tape
- Pencil
- Safety glasses
- Gloves
- Voltage tester (to ensure power is off)
- Ladder (if needed)
- (Optional) Conduit and conduit fittings (if running wiring on the surface of the wall)
B. Mounting Techniques
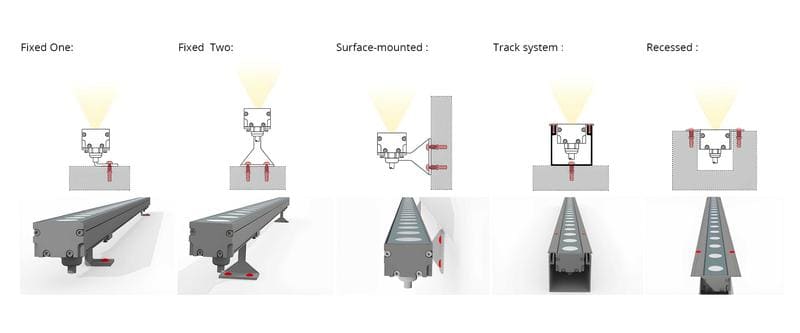
The specific mounting technique will depend on the type of fixture and the surface you’re attaching it to. Here are some common methods:
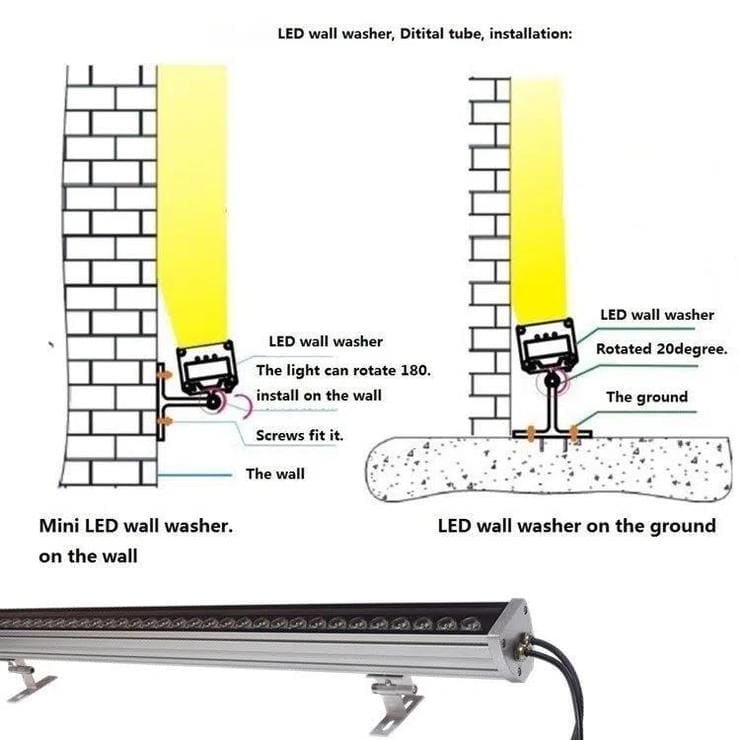
1. Surface Mounting:
This is the most straightforward method. The fixture is attached directly to the surface of the wall, ceiling, or ground.
Step-by-Step Instructions (Surface Mounting):
- Turn off the power: At the breaker box.
- Mark the location: Use a pencil and level to mark where you want to install the fixture.
- Drill pilot holes: If necessary (depending on the wall material and the type of screws), drill pilot holes at the marked locations.
- Attach the mounting bracket: If the fixture has a separate mounting bracket, attach it to the wall using screws.
- Connect the wiring: Connect the wires from the fixture to the power supply wires, using appropriate wire connectors. Follow the manufacturer’s instructions carefully.
- Attach the fixture: Attach the fixture to the mounting bracket (or directly to the wall if there’s no separate bracket).
- Test the light: Turn the power back on and test the light.
Tips for secure installation:
- Use screws that are appropriate for the wall material (e.g., wood screws for wood, masonry screws for concrete).
- Use wall anchors if necessary (especially for drywall).
- Make sure the fixture is securely attached and doesn’t wobble.
- For outdoor installations, use weatherproof connectors and sealant to protect the wiring.
2. Recessed Mounting:
This method creates a cleaner, more integrated look, but it’s more complex to install.
Step-by-Step Instructions (Recessed Mounting):
- Turn off the power: At the breaker box.
- Mark the location: Use a pencil and level to mark the outline of the recess you need to create.
- Cut the recess: Carefully cut the hole in the wall or ceiling, using an appropriate saw (e.g., a drywall saw for drywall).
- Install a mounting box (if required): Some recessed fixtures require a special mounting box to be installed in the recess.
- Run the wiring: Run the power supply wires to the recess.
- Connect the wiring: Connect the wires from the fixture to the power supply wires, using appropriate wire connectors.
- Insert the fixture: Carefully insert the fixture into the recess.
- Secure the fixture: Use the provided clips or screws to secure the fixture in place.
- Test the light: Turn the power back on and test the light.
Ensuring proper fit:
- Measure carefully before cutting the recess.
- Use a template (if provided) to ensure the correct size and shape of the recess.
- Test-fit the fixture before connecting the wiring.
3. Adjustable Brackets:
Many wall washers come with adjustable brackets that allow you to change the angle of the light after installation. This is great for fine-tuning the lighting effect.
How to adjust the angle:
- Loosen the screws or bolts that hold the bracket in place.
- Adjust the angle of the fixture to the desired position.
- Tighten the screws or bolts to secure the fixture in place.
4. Ground Mounting (for landscape lighting):
For illuminating trees, shrubs, or other landscape features, you’ll often use ground-mounted fixtures.
Installation Tips
- Use stakes or ground mounts that are designed for outdoor use.
- Make sure the fixture is securely anchored in the ground.
- Bury the low-voltage wiring at least 6 inches deep to protect it from damage.
- Use waterproof connectors for all wiring connections.
C. Wiring and Connections
Proper wiring is essential for safety and for ensuring your lights work correctly.
1. Low Voltage Wiring:
Low voltage systems (12V or 24V) are generally safer and easier to work with than line voltage systems.
Step-by-Step Instructions (Low Voltage Wiring):
- Turn off the power: At the transformer.
- Connect the low-voltage cable to the transformer: Follow the transformer’s instructions carefully.
- Run the cable to the fixture locations: Bury the cable underground or conceal it in another way.
- Strip the ends of the wires: Use wire strippers to expose about ½ inch of bare wire.
- Connect the wires to the fixture: Use waterproof wire connectors to connect the cable wires to the fixture wires. Match the polarity (positive to positive, negative to negative).
- Test the connections: Turn the power back on and test the light.
Using waterproof connectors:
- Waterproof connectors are essential for outdoor installations. They protect the wiring from moisture and corrosion.
- There are different types of waterproof connectors, including gel-filled connectors and heat-shrink connectors. Choose the type that’s best suited for your project.
2. Line Voltage Wiring:
Line voltage systems (120V or 240V) require more caution. If you’re not comfortable working with line voltage, hire a qualified electrician.
Safety precautions:
- Always turn off the power at the breaker box before working with any electrical wiring.
- Use a voltage tester to confirm that the power is off.
- Follow all local electrical codes.
- Use appropriate wire connectors and electrical tape.
- If you’re unsure about anything, consult a qualified electrician.
Hiring an Electrician
- Complex Installations: For intricate setups, multiple fixtures, or recessed lighting, professional help ensures a safe and code-compliant installation.
- Line Voltage Systems: If you’re uncomfortable working with high voltage, an electrician’s expertise is crucial for safety.
- Uncertainty: When in doubt, it’s always best to err on the side of caution and seek professional assistance.
3. Connecting to a Control System:
If you’re using a control system (DMX, Wi-Fi, etc.), you’ll need to connect the lights to the controller.
Connecting to a Control System (DMX, Wi-Fi, Remote)
- DMX wiring: DMX uses a special type of cable (usually XLR cable). You’ll need to connect the fixtures in a “daisy chain” configuration, following the controller’s instructions.
- Wi-Fi setup: Follow the manufacturer’s instructions to connect the lights to your Wi-Fi network. You’ll typically use a smartphone app to control the lights.
- Remote control pairing: Follow the manufacturer’s instructions to pair the remote control with the lights.
D. Placement Strategies for Optimal Effect
Where you place your lights is just as important as the type of lights you choose. Here are some placement strategies to help you get the best results:
1. Distance from the Wall (Wall Washing):
The distance between the fixture and the wall is a key factor in achieving a good wall washing effect.
| Wall Height | Recommended Distance from Wall |
|---|---|
| 8 feet | 2 – 2.5 feet |
| 9 feet | 2.5 – 3 feet |
| 10 feet | 3 – 3.5 feet |
| over 10 feet | 4+ feet (Experiment!) |
These are just starting points. You may need to adjust the distance depending on the specific fixture, the beam angle, and the desired effect. Experimentation is key!
2. Distance from the Wall (Wall Grazing):
For wall grazing, you want the lights to be much closer to the wall.
General Guideline:
- Place the fixtures within 6-12 inches of the wall. The closer the fixture, the more pronounced the texture and shadows will be.
Again, experimentation is important. Try different distances to see what looks best with your particular wall and fixture.
3. Spacing Between Fixtures:
The spacing between fixtures determines how evenly the light is distributed.
General Guideline:
- For wall washing, a good starting point is to space the fixtures about the same distance apart as they are from the wall. So, if the fixtures are 3 feet from the wall, space them about 3 feet apart.
- For wall grazing, you can often space the fixtures closer together, as the goal is to create overlapping beams of light that highlight the texture.
Avoiding hotspots and shadows:
- Too much spacing can create dark spots between the fixtures.
- Too little spacing can create hotspots (areas of overly bright light).
- The best way to find the optimal spacing is to experiment. Turn on the lights and observe the effect. Adjust the spacing as needed.
4. Angle of Incidence:
This refers to the angle at which the light hits the wall. It affects the appearance of the surface.
- For wall washing: You generally want a relatively wide angle of incidence, so the light spreads out evenly.
- For wall grazing: You want a very narrow angle of incidence, so the light skims along the surface, creating shadows.
5. Layering Light:
Don’t be afraid to combine wall washers with other types of lighting. This can create a more dynamic and interesting effect.
Layering Light Ideas
- Use wall washers to provide general ambient light, and then add spotlights to highlight specific features (like artwork or architectural details).
- Use wall washers to illuminate a wall, and then add uplights at the base of the wall to create a dramatic grazing effect.
- Combine wall washing with downlights to create a balanced and layered lighting scheme.
E. Steps To Select an LED Wall Washer
Step 1: Decide What Effect You Need
- First, you must decide the effect you want. If your wall is flat, you can go for wall washing technique to illuminate the whole wall, to make the room looks more bigger.
- If your wall has special texture, wall gazing technique is a good option to high light the texture.
Step 2: Select Color Patterns
- LED wall washer can be Static White, tunable white, RGB, or RGBW, depend on your demand and budget.
- For a warm and cozy feel, go for warmer color tones of 2400k to 3000k. Meanwhile, if you want to give your lighting a refreshing and calm style, then any color temperature from 5000k to 6000k would be best.
Step 3: Take Measurements
- Use a measuring tape, measure the length of the lighting area. It gives you an idea of how long washer light you need for your lighting project.
- Flexible LED wall washer is your best choice due to its customizable option. They can fit perfectly, no matter how small or large your lighting area is.
Step 4: Consult A Trusted Brand
- After deciding what you need for your lighting project, consult a trusted brand manufacturing LED wall washer lighting. You can ask for customized LED wall washers per your requirements and see what offers they bring you.
- Select the LED wall washer that fits best to your needs.
VI. Creative Design Ideas and Applications
Now for the fun part! Let’s explore some creative ways to use LED wall washers to enhance your spaces.
A. Architectural Lighting
LED wall washers are perfect for showcasing the beauty of buildings.
1. Highlighting Facades:
Use wall washers to illuminate the exterior walls of a building, creating a dramatic and inviting nighttime presence.
Techniques for different building styles:
- Modern buildings: Use cool white light and sleek, minimalist fixtures for a clean, contemporary look.
- Traditional buildings: Use warm white light and more ornate fixtures to complement the classic architecture.
- Historical buildings: Use wall grazing to highlight the texture of stone or brickwork. Consider using amber or warm white light to create an authentic, historic feel.
2. Emphasizing Architectural Details:
Use wall washers to draw attention to specific features, like columns, arches, cornices, or decorative elements.
Using wall washers for architectural details
- Use narrow beam angles to create focused beams of light.
- Use adjustable fixtures to fine-tune the lighting effect.
- Consider using different colors of light to highlight different features.
3. Creating Silhouettes:
Position wall washers behind architectural elements (like columns or statues) to create striking silhouettes against a lit background.
4. Color Washing Buildings:
Use RGB or RGBW fixtures to create dynamic, color-changing effects on building facades. This is great for special events or for creating a memorable brand identity.
5.Grazing vs Washing on building
- If you want to make the building looks bigger, washing technique is a good option.
- If your building with special texture, grazing is more suitable.
B. Landscape Lighting
LED wall washers can transform your outdoor spaces into magical nighttime landscapes.
1. Illuminating Trees and Shrubs:
Use uplighting to create a dramatic effect, highlighting the shape and texture of trees and shrubs.
Uplighting, downlighting, silhouetting:
- Uplighting: Place fixtures at the base of the tree or shrub, pointing upwards.
- Downlighting: Mount fixtures high up (in a tree or on a building) and point them downwards, creating a “moonlight” effect.
- Silhouetting: Place fixtures behind the tree or shrub, creating a silhouette against a lit background.
2. Highlighting Pathways and Walkways:
Use wall washers to provide safe and attractive illumination for paths and walkways.
Safety and aesthetics:
- Use low-level lighting to avoid glare.
- Choose fixtures that blend in with the landscape.
- Consider using motion sensors to turn the lights on automatically when someone approaches.
3. Creating Focal Points:
Use wall washers to draw attention to sculptures, water features, or other garden elements.
4. Moonlighting Effect:
Create a soft, natural glow by mounting fixtures high up in trees and pointing them downwards, mimicking the light of the moon.
C. Interior Lighting
LED wall washers can also be used indoors to create stunning effects.
1. Accent Walls:
Use wall washing or wall grazing to make one wall in a room stand out. This is a great way to add visual interest and create a focal point.
2. Highlighting Artwork:
Use wall washers to illuminate paintings, sculptures, or other art pieces. This will make them stand out and show them off in their best light.
Important considerations:
- Use a high CRI light source to ensure accurate color representation.
- Avoid placing the fixtures too close to the artwork, as this could create hotspots or damage the artwork.
- Consider using adjustable fixtures to fine-tune the lighting effect.
3. Creating Ambiance in Living Spaces:
Use wall washing to create a soft, warm, and inviting atmosphere in living rooms and bedrooms.
Lighting for different rooms
- Warm white light is generally best for creating a cozy and relaxing atmosphere.
- Dimming capabilities are essential for adjusting the brightness to suit different activities and moods.
4. Task Lighting in Kitchens and Bathrooms:
Use wall washers to provide focused illumination for specific tasks, like cooking or applying makeup.
- Cool white light is often preferred for task lighting, as it provides better visibility.
- Consider using adjustable fixtures to direct the light where you need it most.
D. Commercial and Retail Lighting
LED wall washers can help businesses attract customers and create a positive shopping experience.
1. Attracting Customers:
Use wall washing or color-changing effects to make storefronts and displays more eye-catching.
2. Highlighting Merchandise:
Use wall washers to draw attention to specific products, making them more appealing to customers.
3. Creating a Welcoming Atmosphere:
Use warm, inviting lighting to enhance the customer experience and encourage them to stay longer.
4. Signage Lighting:
Make your signs easier to read by washing them in light.
E. Event and Entertainment Lighting
LED wall washers are a staple of event and entertainment lighting.
1. Stage Lighting:
Use wall washers to create dynamic and colorful effects on stage, adding excitement and visual interest to performances.
2. Uplighting for Weddings and Parties:
Use wall washers to add elegance and ambiance to event spaces. Uplighting columns, walls, or draperies can create a magical atmosphere.
3. Color Changing Effects:
Use RGB or RGBW fixtures to create dynamic, color-changing displays that can be synchronized to music or other cues.
VII. Maintenance, Troubleshooting, and Longevity
To keep your LED wall washers looking and performing their best, follow these maintenance and troubleshooting tips:
A. Regular Maintenance
1. Cleaning:
Dust, dirt, and debris can accumulate on the surface of LED wall washers, reducing their light output and potentially causing them to overheat. Regular cleaning is essential, especially for outdoor fixtures.
- Turn off the power: Always turn off the power to the fixtures before cleaning them.
- Use a soft cloth: Gently wipe the surface of the fixture with a soft, damp cloth. Avoid using abrasive cleaners or harsh chemicals, as these could damage the finish.
- Clean the lens: If the fixture has a lens, use a lens cleaner or a mild soap and water solution to remove any dirt or grime.
- Check for obstructions: Make sure there are no leaves, branches, or other objects blocking the light.
2. Inspecting Connections:
Loose or corroded wiring connections can cause flickering lights or even complete failure. Periodically check the wiring connections to make sure they are secure and free of corrosion.
- Turn off the power: Always turn off the power before inspecting any wiring.
- Check for loose wires: Gently tug on each wire to make sure it is securely connected.
- Look for signs of corrosion: If you see any corrosion (green or white powdery buildup), clean the connection with a wire brush and apply a corrosion inhibitor.
- Tighten any loose connections: Use a screwdriver or pliers to tighten any loose screws or wire nuts.
3. Checking for Damage:
Inspect the fixtures regularly for any signs of physical damage, such as cracks, dents, or broken lenses.
- Look for any signs of water damage, especially for outdoor fixtures.
- If you find any damage, repair or replace the fixture as soon as possible.
4. Testing Functionality:
Periodically test the lights to make sure all LEDs are working properly and that any dimming or color-changing features are functioning as expected.
B. Troubleshooting Common Issues
Here are some solutions to common problems you might encounter with LED wall washers:
1. Lights Not Turning On:
If the lights are not turning on, the first step is to check the power supply. Make sure the breaker is not tripped and that the outlet (if applicable) is working. Next, examine the wiring connections to the fixture to make sure they are secure. If the problem persists, the issue might be with the fixture itself or the driver. Try replacing the driver or consult a professional.
2. Flickering Lights:
Flickering lights can be caused by several factors. Check the wiring for loose connections, which are a common culprit. Voltage fluctuations can also cause flickering, especially with dimmable LEDs. Use a voltage regulator if fluctuations are a consistent issue. Lastly, ensure the dimmer switch (if used) is compatible with LED lights, as incompatibility can lead to flickering.
3. Dimming Issues:
If dimming is not working correctly, the first step is to verify the compatibility between the LED fixtures and the dimmer switch. Not all dimmers work well with all LEDs. If compatibility is not the issue, check the wiring connections for looseness or corrosion. If the problem continues, the dimmer switch itself might be faulty and may need replacement.
4. Color Inconsistencies:
Color inconsistencies between fixtures can occur if LEDs are from different batches or have degraded differently. Try to use fixtures from the same manufacturer and batch where color matching is critical. For RGB or RGBW fixtures, check the control settings to ensure they are configured correctly. If individual LEDs are failing, the entire fixture or LED module may need replacement.
5. Water Damage:
Signs of water damage include flickering, dimming, or complete failure of the light, often accompanied by visible moisture or corrosion inside the fixture. For outdoor fixtures, ensure they have an appropriate IP rating for their environment. If water damage is detected, turn off the power immediately. Inspect and replace seals or gaskets if they are damaged. In severe cases, the entire fixture may need to be replaced.
C. Extending the Lifespan of Your LED Wall Washers
Follow these tips to maximize the lifespan of your LED wall washers:
1. Proper Installation:
Follow the manufacturer’s instructions carefully when installing the fixtures. Make sure they are securely mounted and that all wiring connections are correct.
2. Heat Management:
LEDs are sensitive to heat. Make sure the fixtures have adequate ventilation and are not installed in enclosed spaces where heat can build up.
- Avoid installing fixtures near heat sources (like other lights or heating vents).
- If the fixtures have heat sinks, make sure they are clean and free of debris.
3. Voltage Regulation:
Voltage fluctuations can damage LEDs. Use a surge protector to protect the fixtures from power surges.
- If you live in an area with frequent power outages or voltage fluctuations, consider using a voltage regulator.
4. Regular Cleaning and Maintenance:
Follow the maintenance tips outlined above.
5. Choosing High-Quality Fixtures:
Invest in high-quality LED wall washers from reputable manufacturers. They may cost more upfront, but they will likely last longer and perform better.
VIII. Advanced Topics: Smart Lighting and Control Systems

Take your lighting to the next level with advanced control systems.
A. DMX Lighting Control
1. What is DMX?
DMX (Digital Multiplex) is a standard protocol for controlling stage lighting and effects. It’s also used for architectural lighting and other applications where precise control over multiple fixtures is needed.
2. How DMX Works:
DMX uses a “daisy chain” configuration, where each fixture is connected to the next in a line. A DMX controller sends signals down the line, telling each fixture what to do (brightness, color, etc.).
- Addressing fixtures: Each fixture is assigned a unique “address” so the controller can communicate with it individually.
- Sending signals: The controller sends digital signals that tell the fixtures how to behave.
- Creating scenes: You can program different lighting “scenes” (presets) and recall them with the touch of a button.
3. Advantages of DMX:
- Precise control: You have very fine control over the brightness, color, and other parameters of each fixture.
- Complex lighting sequences: You can create complex, dynamic lighting effects that change over time.
- Synchronization: You can synchronize multiple fixtures to create coordinated effects.
4. DMX Controllers:
- There are many different types of DMX controllers, ranging from simple wall-mounted controllers to sophisticated computer-based software.
- Choosing the right controller depends on the complexity of your lighting setup and your budget.
B. Wi-Fi and Smart Home Integration
Control your lights from anywhere with Wi-Fi and smart home technology.
1. Connecting to a Wi-Fi Network:
Many modern LED wall washers can connect to your home Wi-Fi network. This allows you to control them from your smartphone, tablet, or computer.
Wi-Fi Setup
- Follow the manufacturer’s instructions to connect the lights to your Wi-Fi network.
- You’ll typically use a smartphone app to configure the lights and connect them to your network.
2. Using Smart Home Apps:
Once the lights are connected to your Wi-Fi network, you can use a smart home app to control them.
Smart Home App Features
- Turn lights on/off remotely.
- Adjust brightness and color.
- Create scenes and schedules.
- Group lights together to control them as a single unit.
3. Voice Control:
Many smart lighting systems can be integrated with voice assistants like Amazon Alexa, Google Assistant, and Apple Siri. This allows you to control your lights with voice commands.
Voice Control Commands
- “Alexa, turn on the wall lights.”
- “Hey Google, dim the living room lights to 50%.”
- “Siri, set the wall lights to blue.”
4. Creating Automations:
Smart lighting systems allow you to create automations, where the lights respond to certain events or conditions.
Automation Examples
- Schedules: Set the lights to turn on/off automatically at specific times of the day.
- Sunrise/Sunset: Have the lights turn on automatically at sunset and off at sunrise.
- Motion Detection: Use motion sensors to turn the lights on when someone enters a room or approaches a building.
- Geofencing: Have the lights turn on automatically when you arrive home (based on your phone’s location).
C. Future Trends in LED Wall Washer Technology
The world of LED lighting is constantly evolving. Here are some of the trends to watch for:
- Higher Efficiency LEDs: Expect even more energy-efficient LEDs in the future, with higher lumen output per watt and even longer lifespans.
- Improved Color Rendering: Advances in LED technology will continue to improve color rendering, making colors appear even more natural and vibrant.
- Miniaturization: LED fixtures will likely continue to get smaller and more discreet, allowing for even more creative and flexible lighting designs.
- Wireless Control Systems: Wireless control systems will become even more reliable and user-friendly, with improved range and responsiveness.
- Integration with Other Smart Home Devices: Expect to see even tighter integration between LED lighting and other smart home devices, such as thermostats, security systems, and entertainment systems. This will allow for even more sophisticated automations and control options.
IX. Case Studies

Let’s look at some real-world examples of how LED wall washers have been used to create stunning lighting effects:
Case Study 1: Residential Architectural Lighting
Project: A homeowner wanted to enhance the curb appeal of their modern home and highlight its architectural features.
Solution: LED wall washers were installed to graze the textured stone facade of the house, creating dramatic shadows and emphasizing the unique design. Warm white light was used to create a welcoming and inviting atmosphere.
Results: The lighting transformed the home’s nighttime appearance, making it a standout feature in the neighborhood. The homeowners were thrilled with the enhanced beauty and security.
Case Study 2: Commercial Retail Lighting
Project: A clothing boutique wanted to attract more customers and make their storefront more appealing.
Solution: RGBW LED wall washers were installed above the storefront windows, programmed to cycle through different colors and create dynamic lighting effects. This drew attention to the store and highlighted the merchandise displayed in the windows.
Results: The store reported a significant increase in foot traffic and sales after the lighting installation. The dynamic lighting created a more engaging and memorable shopping experience.
Case Study 3: Landscape Lighting Project
Project: A homeowner wanted to create a dramatic and inviting nighttime landscape.
Solution: LED wall washers were used to uplight trees, shrubs, and a stone retaining wall. Warm white light was used to create a soft, natural glow. The lighting highlighted the textures and shapes of the landscape elements, creating a beautiful and relaxing outdoor space.
Results: The homeowner was delighted with the transformation of their backyard into a nighttime oasis. The lighting extended the usability of the outdoor space and created a stunning visual display.
Case Study 4: Event using dynamic color-changing wall washers.
Project: To set up a romantic environment for a wedding.
Solution: RGBW wall washer light can provide millions of colors to meet the wedding theme.
Results: The event got more charming, and created a magical atmosphere.
Case Study 5: Museum/Art Gallery highlighting features.
Project: Highlight the texture of the artwork.
Solution: By carefully selecting the intensity and color temperature of the light, with high CRI, designers can evoke different emotions, from warmth and coziness to a sense of openness and tranquility.
Results: The texture of the artwork can be shown perfectly.
X. Conclusion
LED wall washers are a powerful tool for transforming spaces, both inside and out. They offer a unique combination of aesthetic appeal, functional benefits, energy efficiency, and versatility. Whether you’re looking to enhance your home’s architecture
, create a dramatic landscape, attract customers to your business, or set the mood for a special event, LED wall washers can help you achieve your vision.
Remember, the key to successful wall washer lighting is careful planning. Think about your needs, choose the right fixtures, install them correctly, and don’t be afraid to experiment with different placement strategies and design ideas. And, of course, prioritize safety by following all electrical codes and using appropriate precautions.
With the knowledge you’ve gained from this guide, you’re now well-equipped to explore the exciting possibilities of LED wall washer lighting. So go ahead, unleash your creativity, and illuminate your world!
XI. Appendix
Resources for selecting a good manufacturer.
- Check Online Reviews and Ratings: Websites like Trustpilot, Yelp, and Google Reviews can provide insights into customer experiences with different manufacturers.
- Industry Certifications: Look for manufacturers with certifications like UL, ETL, Energy Star, or RoHS, indicating compliance with safety and quality standards.
- Warranty and Support: Opt for manufacturers offering comprehensive warranties and responsive customer support, demonstrating confidence in their products.
- Project Portfolio: Examine the manufacturer’s previous projects or case studies to assess their experience and the quality of their work.
- Ask for Recommendations: Seek recommendations from lighting professionals, architects, or contractors who have experience with LED wall washers.
Glossary for all terms used in the article
- Accent Lighting: Lighting used to highlight specific features or objects.
- Ambient Lighting: General, overall lighting that provides a comfortable level of brightness.
- Beam Angle: The angle at which light is emitted from a fixture.
- CCT (Correlated Color Temperature): A measure of the color appearance of white light, measured in Kelvins (K).
- COB (Chip on Board): A type of LED technology where multiple LED chips are mounted directly onto a substrate.
- Color Rendering Index (CRI): A measure of how accurately a light source shows the true colors of objects.
- DMX (Digital Multiplex): A protocol for controlling stage lighting and effects.
- Driver: An electronic component that regulates the power supplied to LEDs.
- Foot-candle: A unit of illuminance (light falling on a surface).
- Heat Sink: A component that dissipates heat away from LEDs.
- IP Rating (Ingress Protection Rating): A measure of a fixture’s protection against dust and water.
- Kelvin (K): A unit of measurement for color temperature.
- LED (Light Emitting Diode): A semiconductor device that emits light when an electric current passes through it.
- Line Voltage: Standard household voltage (typically 120V or 240V).
- Low Voltage: A lower voltage (typically 12V or 24V) that requires a transformer.
- Lumen: A unit of luminous flux (the total amount of light emitted by a source).
- Lux: A unit of illuminance (light falling on a surface), equal to one lumen per square meter.
- Optics: Lenses or reflectors that shape and direct the light emitted by LEDs.
- RGB: Red, Green, and Blue (referring to LEDs that can produce a wide range of colors).
- RGBW: Red, Green, Blue, and White (referring to LEDs that include a white LED for improved color mixing).
- SMD (Surface Mounted Device): A type of LED technology where the LED chip is mounted directly onto a circuit board.
- Task Lighting: Lighting designed to provide illumination for specific activities.
- Tunable White: LEDs that allow you to adjust the color temperature of the white light.
- Uplighting: Lighting that is directed upwards.
- Wall Grazing: A lighting technique where lights are placed close to a wall to highlight its texture.
- Wall Washing: A lighting technique where lights are placed further from a wall to create a smooth, even wash of light.
- Watt: A unit of power consumption.